The Guitar Player's Resource
Improvisation, or "improv" for short, is the act of coming up with a solo on the spot. Some guitarists prefer to improv all their solos because it can sound more fresh and exciting. However, if you don't have much to draw from it is likely that all your solos will begin to sound the same. The way around this is to work on "phrasing". Think of phrasing in terms of holding a conversation with someone. The more extensive your vocabulary is the easier (and more impressive) it will be for you to express your thoughts and feelings and hold an intelligible conversation. Just as a whole thought can not be conveyed with a single word a whole musical "thought", or phrase, can not be conveyed with a single note. You have to string enough words together to form a sentence and then enough sentences to form a paragraph or whatever it is you may need to tell your story. In order to come up with an impressive solo, you need to know how to stretch what you know in a myriad of different ways. Even if you don't have an extensive vocabulary (musical or otherwise) you can still come up with listenable and interesting solos if you know just how to "word" everything.
This lesson assumes that you have some experience playing the guitar, so I left out any details that are not necessary for the lesson. If anything confuses you feel free to email me, or failing that, look around the internet for your answers.
You also need to understand something about my style of teaching. I subscribe to the philosophy that you will get much more mileage out of this lesson if you stretch it out and wring it for all it's worth! Exploration is key, and you need to take these licks and really make them your own. Don't just play whats written here. See if you can take my examples and make them better!
And of course, the only key to developing good phrasing skills is to just play. Study this lesson enough to get it under your fingers and then never put that guitar down.
This lesson is divided into 5 parts:
I. The Minor Pentatonic Scale
II. Minor Pentatonic Licks
III. Longer Runs
IV. Phrasing
V. The Solo
Each part builds on the previous section, so make sure you take your time and really practice what is laid out. Don't continue unless you have a firm grasp on the material. And when in doubt.. email me.
To hold a conversation you obviously need to know a word or two. So here is a bit of "vocab" for your musical language. The minor pentatonic scale has been used by every guitarist worth his salt. It is a staple in the rock and blues styles and is the perfect spot to start if you are just starting out, since the shape it makes on the fretboard makes it easy to remember.
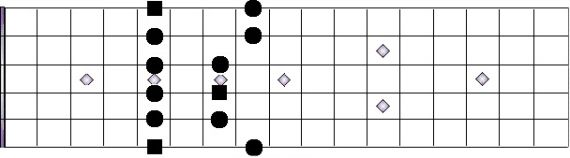
Here it is on a neck diagram so you can see exactly what shape it makes on the guitar.
And here it is in tablature.
Our improv examples, as well as the backing track, will be in the key of A. What that means is place the note with the square (or the very first note) on the letter name of the key that you want the scale to be in. This square marks the root note. Just view the root note as "home" base. Every other note in the scale/chord/song/whatever, is based off this note. So this same shape allows you to generate 12 minor pentatonic scales: one for each key. For sake of simplicity we will be looking at one key throughout the example, but you can move the scale and licks to other parts of the neck to match whatever key you are playing in.
So step 1 requires that you memorize this scale so you know where you need to put your fingers when it comes time to start improvising. Be able to play this in all 12 keys. You need to know it like the back of your hand so you can spend less time on thinking of what notes you can and can't play, and more time on just letting it rip!
A carpenter can only get the job done quickly and accurately if he has good, reliable tools and knows just how to use them. Likewise, if you don't know what to do with the pentatonic scale then it's not exactly a useful tool. So to get started we need to arm the budding soloist with the knowledge necessary to use his new tools.
If you search the internet you should have no problem coming up with a huge assortment of pentatonic licks. There are tons of great sites out there. I have taken the liberty to list my favorites in the "links" section of my website, www.dansorber.com.
An even better source is to take a look at some of your favorite guitar players and either by listening or finding tablature, see if you can't cop some licks from them. Slash from Guns N' Roses and Kirk Hammett from Metallica stick out in my mind as big rock guitar pentatonic wankers. The guys from Iron Maiden use a lot of pentatonic based licks (Adrian Smith in particular). Angus Young from AC/DC practically made his whole career on the shape above. Be warned that these players will quite often mix other scales in with their solos!
So with that in mind, I am only going to show you enough to get you on your way. There will be many more installments to come of this series, so you can always check out future updates for more licks, but I am trying to get you to think outside the box and come up with your own rather than just memorizing a bunch of ideas.
So here we go:
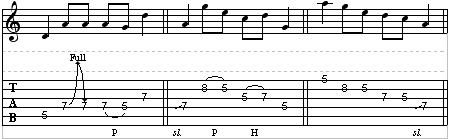
The following licks are going to assume you are familiar with some guitar techniques such as bending, hammers, pulls and slides:
Here are some basic ideas. Nothing too fancy, but they can certainly get the job done if used at the right times.
Step 1. Play these licks until you are comfortable enough with the way they sound. Accuracy is always key, especially on the whole step bends! Make sure they sound in tune!
Step 2. Try these out and see how they sound. Try linking a few together to see if you can come up with some slightly longer runs. The biggest thing you need to do: listen. See if you can't throw some extra, "connecting" notes from the pentatonic scale inbetween your licks.
Step 3. Once you are comfortable with these licks and how the pentatonic scale sounds try coming up with some of your own. You are bound to create a lot of ideas that suck... but you will almost certainly hit on a handful of gems that you like. Throw out the bad ideas and keep the good by writting them down or recording them. If you need some help in this area just use the above licks as guidelines: move notes around, play them backwards, forwards, sideways, upside down, on different strings, add notes in, take notes out!
Step 4. Now just PLAY! Let it rip! For this step don't try to think too much. That's why we practice as much as we do. So we don't need to think when it's time to make some noise. Just let go! I know that can be hard, but just do it! You've got nothing to lose and everything to gain. And as my own teacher, Terry Syrek once told me, "There are no wrong notes... only happy mistakes!"
That holds true, especially with our backing track. The pentatonic scales works so well over it that there really are no wrong notes.
So now that we are rocking with some short fills and ideas, it's time to learn a thing or two about stretching a rather basic idea into a longer run. You'd be surprised at how easy some impressive sounding runs actually are.
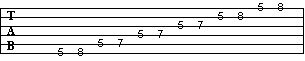
Let's take a basic four note idea:
Woo...
Now let's rip:
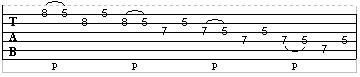
What was that?! Sounded like a cool blues run to me! So what did I do?
See each boxed off lick? All I did was take our original 4 note idea, played it, moved the whole idea up a string, played it again, moved it up a string, etc... I did that four times. It sounds pretty impressive for being based on such a simple idea... The only thing you need to be careful of is to stay inside the pentatonic scale.
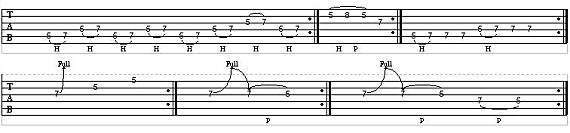
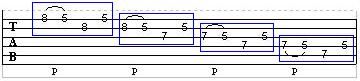
Let's take it up a notch and bring this home:

I took our idea but turned it around by adding a simple hammer at the end and hanging on to that last note and letting it sing! Generally, you want to come up with an ending of some sort to detract from it sounding like a repeating pattern all the time. Right when the listener thinks they know where the lead is going, BAM!, you hit them with a curve ball.
Let's kick this up another notch and slap in another idea we had:
Now that's a nice sounding run! And it's been entirely based off the ideas we've been generating.
So now that you are starting to get the idea how to link these little ideas together, see how many runs you can come up with. As I've been saying this entire lesson: you need to take this stuff and run with it. The only way you are going to truely benefit from this and take your first real steps to creating your own lead style is to just squeeze this out for everything it's worth. Use what you've learned here as general guidelines and just play.
But remember: the only true test is how does it all sound to you? If your ears like it then it is good enough! Don't make the mistake of thinking of anything in this lesson as a rule set in stone. They are just guidelines designed to help you with soloing. Also, don't make the mistake of comparing your progress to other players. Just concentrate on making the most out of what you have and always strive to go one step further.
If it sounds good then it is good. Period.
Now that we are starting to see the big picture let's zoom in again and take a closer look:
A good way to develop your phrasing is to limit yourself to what you are allowed to use. I stress the fact that you will be a much better musician if you can take what you have and make the most of it, and this next exercise does just that: forcing you to make a lot out of a little.
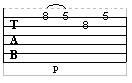
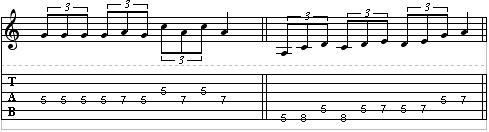
So let's limit ourselves to a particular rhythm:
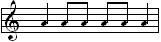
Take this simple rhythm and see how many licks you can come up with:
Working on the little details like this and then incorporating them into solos and your overall playing style will yield some great results in the long run. Not to mention the benefit it will have on your creativity as well as your ability to come up with something listenable on the spot.
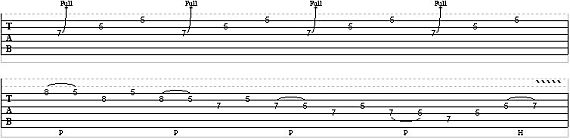
Let's try a new rhythm:

And new licks:
Try using your own rhythms and see how many ideas you can coax out of them. Don't be afraid to use any special techniques you may know, such as hammers and pulls.
A variation on this is to limit yourself to just a handful of notes, say three or four. Or you can even limit yourself to both certain notes and rhythms!
So now that we've spent a good deal of time with pentatonic lead ideas, let's try and come up with a full solo.
A good solo (or song) must be like a good story if you really want to captivate the listener. It should have a beginning, middle and an end. You should try and build to a climax and then work toward a resolution.
When you write an essay or story you normally seperate different ideas into paragraphs. You should do the same with your solo. The easiest way to come up with something is to think in terms of different phrases that build off one another until you reach the solo's climax, and then ultimately the resolution.
Your average solo is 8 bars long, so let's make ours that length for sake of simplicty. It can be as long or as short as you like, but I am going to stick to something that can be played within the progression without carrying over into another repeat.
For out first phrase I've decided to use our long run from before. The opening bends just really kick the listener in the face, loudly announcing, "ITS THE SOLO SECTION!" It also sets us up nicely for an upbeat solo:
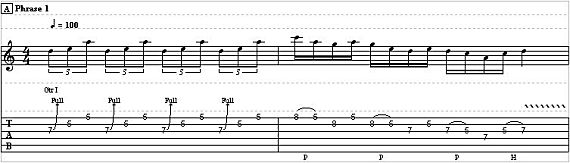
As you can see, eighth note triplets and a sixteenth note run at 100bpm is a pretty nice clip. For the less experienced players out there: take this slowly and practice the timing to a metronome. Only build the speed up when you are comfortable at your current setting and play through without mistakes.
To add some dynamic and to announce the end of the phrase I finished it off with a hammer and some vibrato on a quarter note.
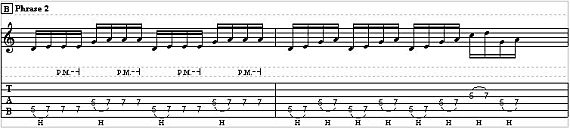
Phrase 2 is heading for the climax by building with intensity using straight sixteenth note runs.
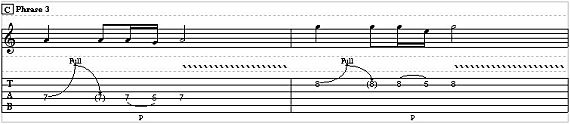
Some bends and simple pull offs slows things down and breaks up the sixteenth note runs. The faster stuff sounds that much faster when you take a break here and there. Think of these two bars as the calm before the storm:
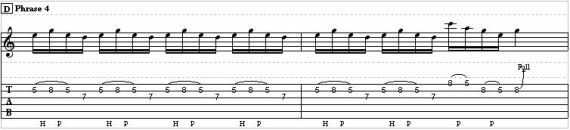
The solo reaches it's climax with a fast, repeating sixteenth note lick. I turned it around at the end with a slight variation and a nice bend in order to bring things home.
Download the full solo (Power Tab).
That about wraps things up. Despite how long this lesson is, there are only two tests your solo needs to pass: Does it sound good, and is it fun? If you answered "yes" to both those questions then all those guidelines and rules need not apply.
Stay tuned for the next installment of my Improv series for more tips and soloing techniques. For now, you've got enough to work with. Any questions? Feel free to email me at the link in the sidebar.
Dan Sorber is a highly respected instructor and guitarist living in the northern New Jersey area.
His teaching approach is based around helping students achieve their goals while making it fun. Dan has been playing for 13 years and teaching for 5.
His influences include Joe Satriani, Iced Earth and Symphony X. Dan currently plays for the melodic progressive metal band, Ferox Canorus.
