The Guitar Player's Resource
More and more budding music artists, photographers and videographers are deciding to set up their own home music, streaming or photography studios. And, why not? For the cost of renting professional space a few times, you could invest in your own studio that you can use any and every time you’re feeling inspired. You can record music, a podcast or YouTube channel videos. Or, you can shoot still photos, all conveniently in your own space. This is the perfect setup for many YouTube stars, and it won’t cost a fortune if you set it up carefully.
We have some helpful advice about how to choose a room and convert it into the studio of your dreams (within your budget) and a superb outlet for your creativity.
First, you’ll need to decide which room of your house will make the best home studio location.
There are some important factors, including the size and dimensions of the room, its surfaces (such as walls, ceiling and flooring), the ceiling height, and noise levels inside and outside the room. We’ll advise about creating a music studio first, and then a video and still photography studio.
An ideal recording studio is large and provides plenty of room for musicians, instruments, recording equipment and other gear. Make sure there’s room for you and whoever else is coming to record or mix music to sit, lounge and be comfortable. You don’t want to cramp anyone’s style, so to speak. A larger room usually ensures a better recorded sound, too.
Along with size, consider a room that’s quiet—the more quiet the better. Go inside each room and listen for outside noises that could show up, uninvited, in your recordings. Barking dogs? Roommate or children’s noise? A TV in the other room? Traffic, birds, obnoxious neighbors? Try to pick the quietest room in the house, if possible.
Also look at your floor, ceiling and walls. You don’t want a square room or a concrete floor, and you don’t want very low ceilings or drywall walls that are parallel. Floor-to-ceiling windows or large mirrors also are no-nos in a home recording studio. No room will be perfect, so try to work with the room that fits the bill the best. For instance, you can always add more sound-absorbing material to hard walls and low ceilings.
Wood floors are a good choice for a recording studio room because carpeting can result in muffled recorded sounds.
And if you are planning on streaming your own content, you might want to ensure your room is equipped with good internet connectivity! You can also find a lot of great resources for content creators here.
Now that you’ve found the most ideal room in your house, it’s time to empty it of its current contents and start building your studio.
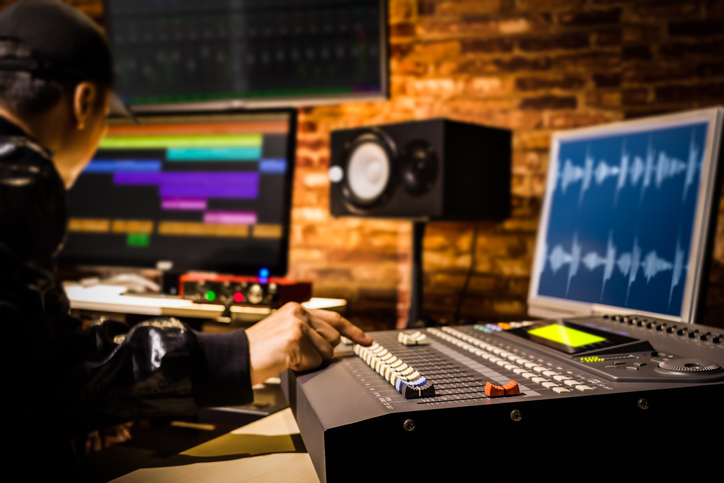
There are some must-haves for your home music studio. Those include a good computer to record, mix and store music, along with music-mixing software, an audio interface, a microphone with a pop filter, a microphone stand and cable, headphones, and monitor speakers. You’ll also want a desk, monitor speaker stands and a comfortable recording chair.
Your music needs will dictate what type and how much you’ll need to spend on an audio interface. The USB audio interface lets you connect your headphones, microphone and headphones to your computer. The more interface connections it contains, the more versatility you’ll have when recording.
You can start with a moderately-priced interface and then upgrade as needed. Keep in mind that you’ll need more channels for projects involving drums or a number of vocals at one time.
When choosing a microphone, buy a mid-range one with a large diaphragm condenser that’s good for vocals and acoustics like acoustic guitars. Don’t forget a microphone pop filter to minimize the “pop” sound that people make when singing or speaking sounds like “t” and “p”.
You’ll need one microphone stand per microphone. Invest in one that telescopes and adjusts well so you can place it at the perfect level for your voice, whether you’re standing or seated, and for any instruments.
When purchasing headphones, remember that there are a couple of types: open-back headphones (for mixing) and closed-back headphones (for monitoring while you’re recording and mixing at times).
Installing the best acoustic treatment for your room choice is critical to the quality of your musical output. Acoustic treatments help make your space as “neutral” as possible, absorbing or soaking in the reverberation in your room when you’re recording and mixing.
There are three kinds of acoustic treatments: panels, diffusers and bass traps. Panels absorb sound energy, diffusers scatter and spread sound waves around the room, and bass traps trap lower frequency sounds.
Acoustic treatments or soundproofing, help your music sound more like your music and not like something recorded in your bedroom. There are numerous options for acoustic treatments in many budget ranges. You might consider foam panels because of their lower cost, but keep in mind they only absorb high-frequency sounds.
Because house rooms typically aren’t designed to become an audio production studio, you’ll need to do some trial and error before you get the acoustic renovations right. Taking out all the furnishings, including any pictures or posters, mirrors and furnishings that could vibrate and then analyze the empty room by walking around and making lots of noise.
Listen, and gauge how much sound diffusion or absorption you already have and how much you may need. You’ll probably need to move the acoustic pieces around the room as you perfect the sound, so don’t permanently affix them until you’re sure.
You can buy entire music studio acoustic treatment kits. However, to save money, you may want to make your own fiberglass panels. To make the panels more efficient, don’t forget to include an air gap between the panels and your walls.
If you’re on a very strict budget, instead of buying or making panels, you can absorb high-frequency sounds with objects around the house, including thick quilts or duvets, thick drapes or even mattresses.
Don’t forget to add bass traps to room corners to help absorb lower-frequency acoustical energy. Bass traps help solve the “muddy” sound in your mixes so you hear the bass sound better.
Believe it or not, where you put the furniture in your new music recording studio is important. Comfort and accessibility are important. Do you have enough room to sit and play a guitar, bass, or drums, and also to stand up or sit down at the microphone when recording? Does the space let you easily move from one spot to another? Is there room for others so you can collaborate or record a band? Do you have room to mix your music after recording?
To help sound quality, remove from the room anything that can vibrate, including wall decorations or objects on your desk. Keep furnishings to a minimum, like a sturdy desk near a wall for mixing. Don’t forget a comfortable chair for playing music or singing, and a couch or even bean bags for relaxing while listening to music. Pay attention to the flooring. Use area rugs under vibrating instruments like drum kits to muffle some of the sound.
Where to Place your Equipment
Strategically place your microphone away from your desk so the sound of your computer fan doesn’t get picked up on recordings, but close enough so it picks up only the sounds you want.
Position your monitors ideally at ear level, on either side of your computer, and carefully read the instructions that come with your monitor speakers. The placement of your monitors is extremely important and can make a big difference in how you hear the sound.
Are you a photographer or videographer? A home studio is within your reach, too. When choosing a room or space for your home studio, consider whether it will be a dedicated space or whether a portable studio would fit your needs.
Are you going to do video shoots or still photography shots frequently in your studio (such as products for an Etsy shop or how-to videos)? Or, will you be out and about, shooting at different locations? If you’ll only do some photography or videography at home, you may consider simply a corner of a room with a window, a clean wall wide enough to accommodate backdrop scenes, a desk, comfy chair and a good computer with the necessary photo editing or video editing software.
If you’re serious about your craft, then you’ll probably want more than a portable space.
One of the most crucial aspects of your home video or still photography studio is good studio lighting. If you have a small space and there’s a window in that space, it’s more advantageous to use natural light than artificial light. The smaller your room studio is, the more difficult it is to control artificial lighting. If you use artificial lighting, cover the window with light-blocking drapes or other coverings.
You’ll want a number of light modifiers, which are ways to manipulate the light that falls onto your subject. Reflectors bounce light back into the scene and can be different colors, tweaking the light that falls on your subject. Umbrellas help soften the light’s or flash’s harshness or intensity. Softboxes or octaboxes are similar to umbrellas but give better control of lighting and offer a softer glow, ideal for portraits.
You’ll also want to equip your studio with grids, which let you concentrate a light source in beams. Other helpful light modifiers are gels, which are semi-transparent sheets that help change the background color and bring light effects for portraits and other subjects.
Flags are also must-have light modifiers. They stop lights from bouncing around your room. You can even make your own flags by painting panels, curtains, a cloth or cardboard black and positioning where needed.
You can purchase these modifiers as you need them or buy studio lighting kits. Some kits also include the lights, light stands and light bulbs.
Include several photography lights in your studio and use natural-light-mimicking light bulbs. And don’t be afraid to use some holiday lights if they fit your projects. Also purchase sturdy light stands (they work similar to camera tripods), one stand for each light. Don’t be tempted to buy cheaper, more lightweight versions: they’re wobbly and will topple fast when bumped.
Besides lighting, you’ll need some essentials for your home video/photography studio, including a backdrop system, a stable surface desk, computer, camera or video equipment, flashes, flash trigger, a tripod, chairs and more.
You’ll want some good backdrops and a system to hold up the backdrops. You can purchase kits that come with several generic backdrops, like a green screen, a black screen or white one. Add backdrops as the need arises.
Buy light triggers that are compatible with your camera, so the lights communicate and fire in tandem with your camera’s shutter.
Be sure to invest in a few power strips and extension cords because you’ll be hooking up lots of lights, computer, chargers, and even fans. You may also want a step ladder handy for when changing the point of view on a person or object. It also comes in handy for changing backdrops or the settings on tall lights.
To keep your photography or video subjects comfortable or imitate the look of wind blowing, you may need a fan or two. The lights can also generate quite a bit of heat.
You’ll want some stools and comfortable furniture, and if you’re doing demonstration videos, consider an overhead mirror. They can be pricey, but show an exceptional overhead angle when someone is demonstrating something, such as cooking, crafting or repairing an object.
For a still photography studio, you won’t need acoustic treatment. However, if you’re shooting videos with music, your YouTube channel or a video broadcast, the same acoustic principles apply as with a music studio.
When you’re moving furniture into your home photo studio, keep in mind that people waiting their turn need to relax away from light stands and other equipment like your camera. Have a separate, comfortable seating area with a sofa or other lounging furniture. You don’t want to crowd your room with furnishings, however, because you’ll need plenty of room to move around the subject you’re photographing. If your studio concentrates on videography, you’ll want a sturdy surface and comfortable yet supportive chair like an office chair. Also, if you have some furniture that’s looking old, keep in mind that you can always give it a new life by doing some simple makeover magic.
No matter what kind of home studio you’re setting up – for music, podcasts, videos, streaming, still photography, or just screen sharing, start with the basics and upgrade as you see fit (and your budget allows). You’ll be amazed how easy it is to light that spark of creativity as you experiment and perfect your craft in the convenience of your own home.
